GettingStarted
Introduction
This document consists of three part:
- The first part explains how to operate in demo scene;
- The second part helps you get started with material developemnt;
- The last part demonstrates component development.
Basic Operation in DemoScene
This part help you get started with the AfterglowRender demostration scene. Once you have completed application deployment and startup, a demostration scene will be presented. Following the guide below will help you get started quickly.
Movement
| Key | Action |
|---|---|
W |
Forward |
A |
Left |
S |
Backward |
D |
Right |
Q |
Dive |
E |
Rise |
Hold Shift |
Dash Mode |
Look Around
| Key | Action |
|---|---|
LeftMouseButton + MoveMouse |
Rotate Camera |
Press
Tabto switch to First Person Mode, where you can control camera rotation withMoveMouseonly.
Controller State
See class acl::SimpleController, ActionComponentLibrary.h
| Key | Action |
|---|---|
+ |
Increase Field of View |
- |
Decrease Field of View |
Ctrl + + |
Increase Movement Speed |
Ctrl + - |
Decrese Movement Speed |
GUI
See class AfterglowGUI, AfterglowGUI.h
| Key | Action |
|---|---|
` |
Open GUI Console Panel |
Interative Test
See class acl::InteractiveTest, ActionComponentLibrary.h
| Key | Action |
|---|---|
Ctrl + D |
Create Debug View Box |
Ctrl + F |
Create Error Boxes |
Ctrl + G |
Remove Material Synchronization Test |
Ctrl + Shift + H |
Destory Entity Test |
Material Development
This part demostrates how to develop visual effect in AfterglowRender.
Create an Entity
Before you start working with material system, you need an entity to hold corresponding models and materials.
An entity can be created either before or after the render thread starts. If you need to register a custom render PassSet, the eneity must be created before the rendering thread starts.
	// Insert these codes at the end of the AfterglowApplication::AfterglowApplication(), AfterglowApplication.cpp.

	// Create an entity via AfterglowSystem, which contains StaticMeshComponent and EntityRotatorComponent.
	auto& exampleEntity = _system.createEntity<AfterglowStaticMeshComponent, acl::EntityRotator> ("ExampleEntity");
	// Set the entity's translation and rotation.
	exampleEntity.get<AfterglowTransformComponent>().setTranslation({ 4.0f, 4.0f, 0.5f });
	exampleEntity.get<AfterglowTransformComponent>().setEuler({ 30.0_deg, 0.0_deg, 0.0_deg });
	// Set the entity's model.
	// Note: The resource pool handles the memory management of model assets, so you don't need worry about the redundant model loading from the same path.
	exampleEntity.get<AfterglowStaticMeshComponent>().setModel("Assets/Shared/Models/Sphere.fbx");
	// Use a registered material that has been previously registered:
	// std::string standardMaterialName = materialManager.registerMaterialAsset("Assets/Shared/Materials/Standard.mat");
	// Assign the material to the entity.
	exampleEntity.get<AfterglowStaticMeshComponent>().setMaterial(standardMaterialName);
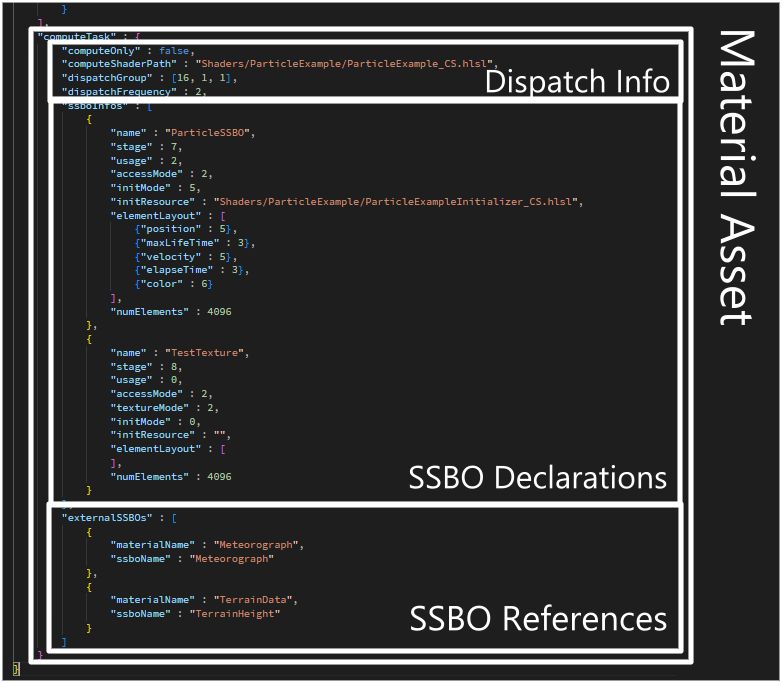
Understanding Material Asset
In AfterglowRender, we use seperate material asset files to define the pipeline states and resources. The diagram below shows the sturcture of the material asset.
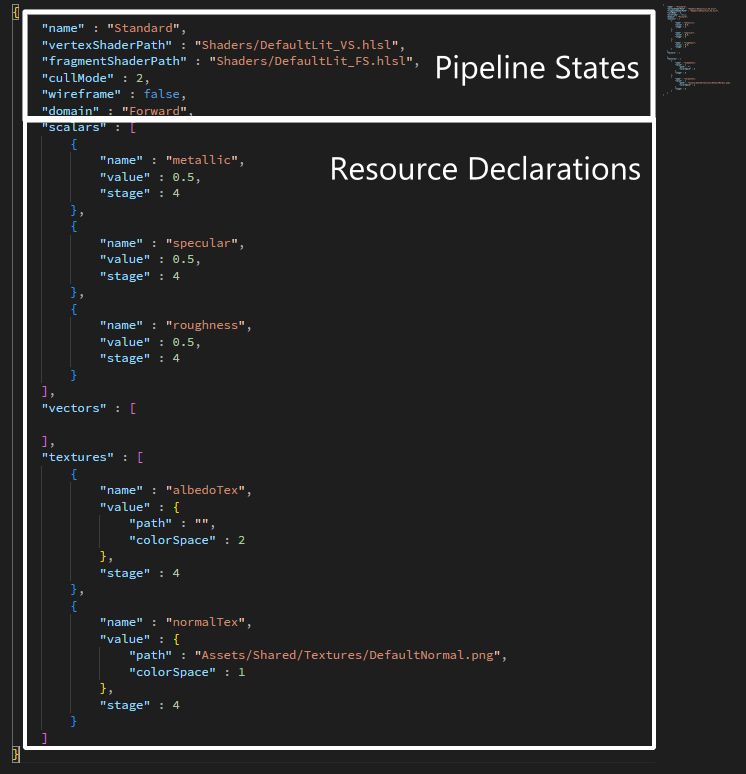
Material asset stored in json format. Some fields and enumerations are not shown in the diagram; for more details, refer to Documents/AssetStruct/Material.md.
Shader Asset
AfterglowRender uses HLSL as shader language. Thanks to the material system, there is not need to write strictly aligned resource declarations in shaders.
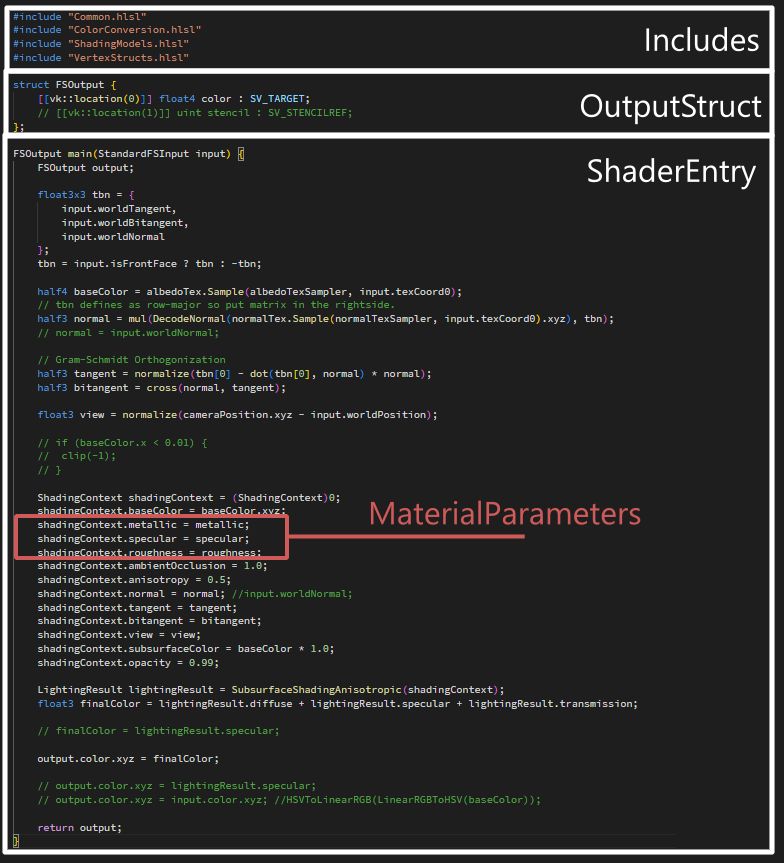
Some internal variables can be used in shaders, e.g. transform matrices, system status and entity infomations. For more details, see Documents/Shader/InternalVariables.md.
Edit Material and Shader in Flight
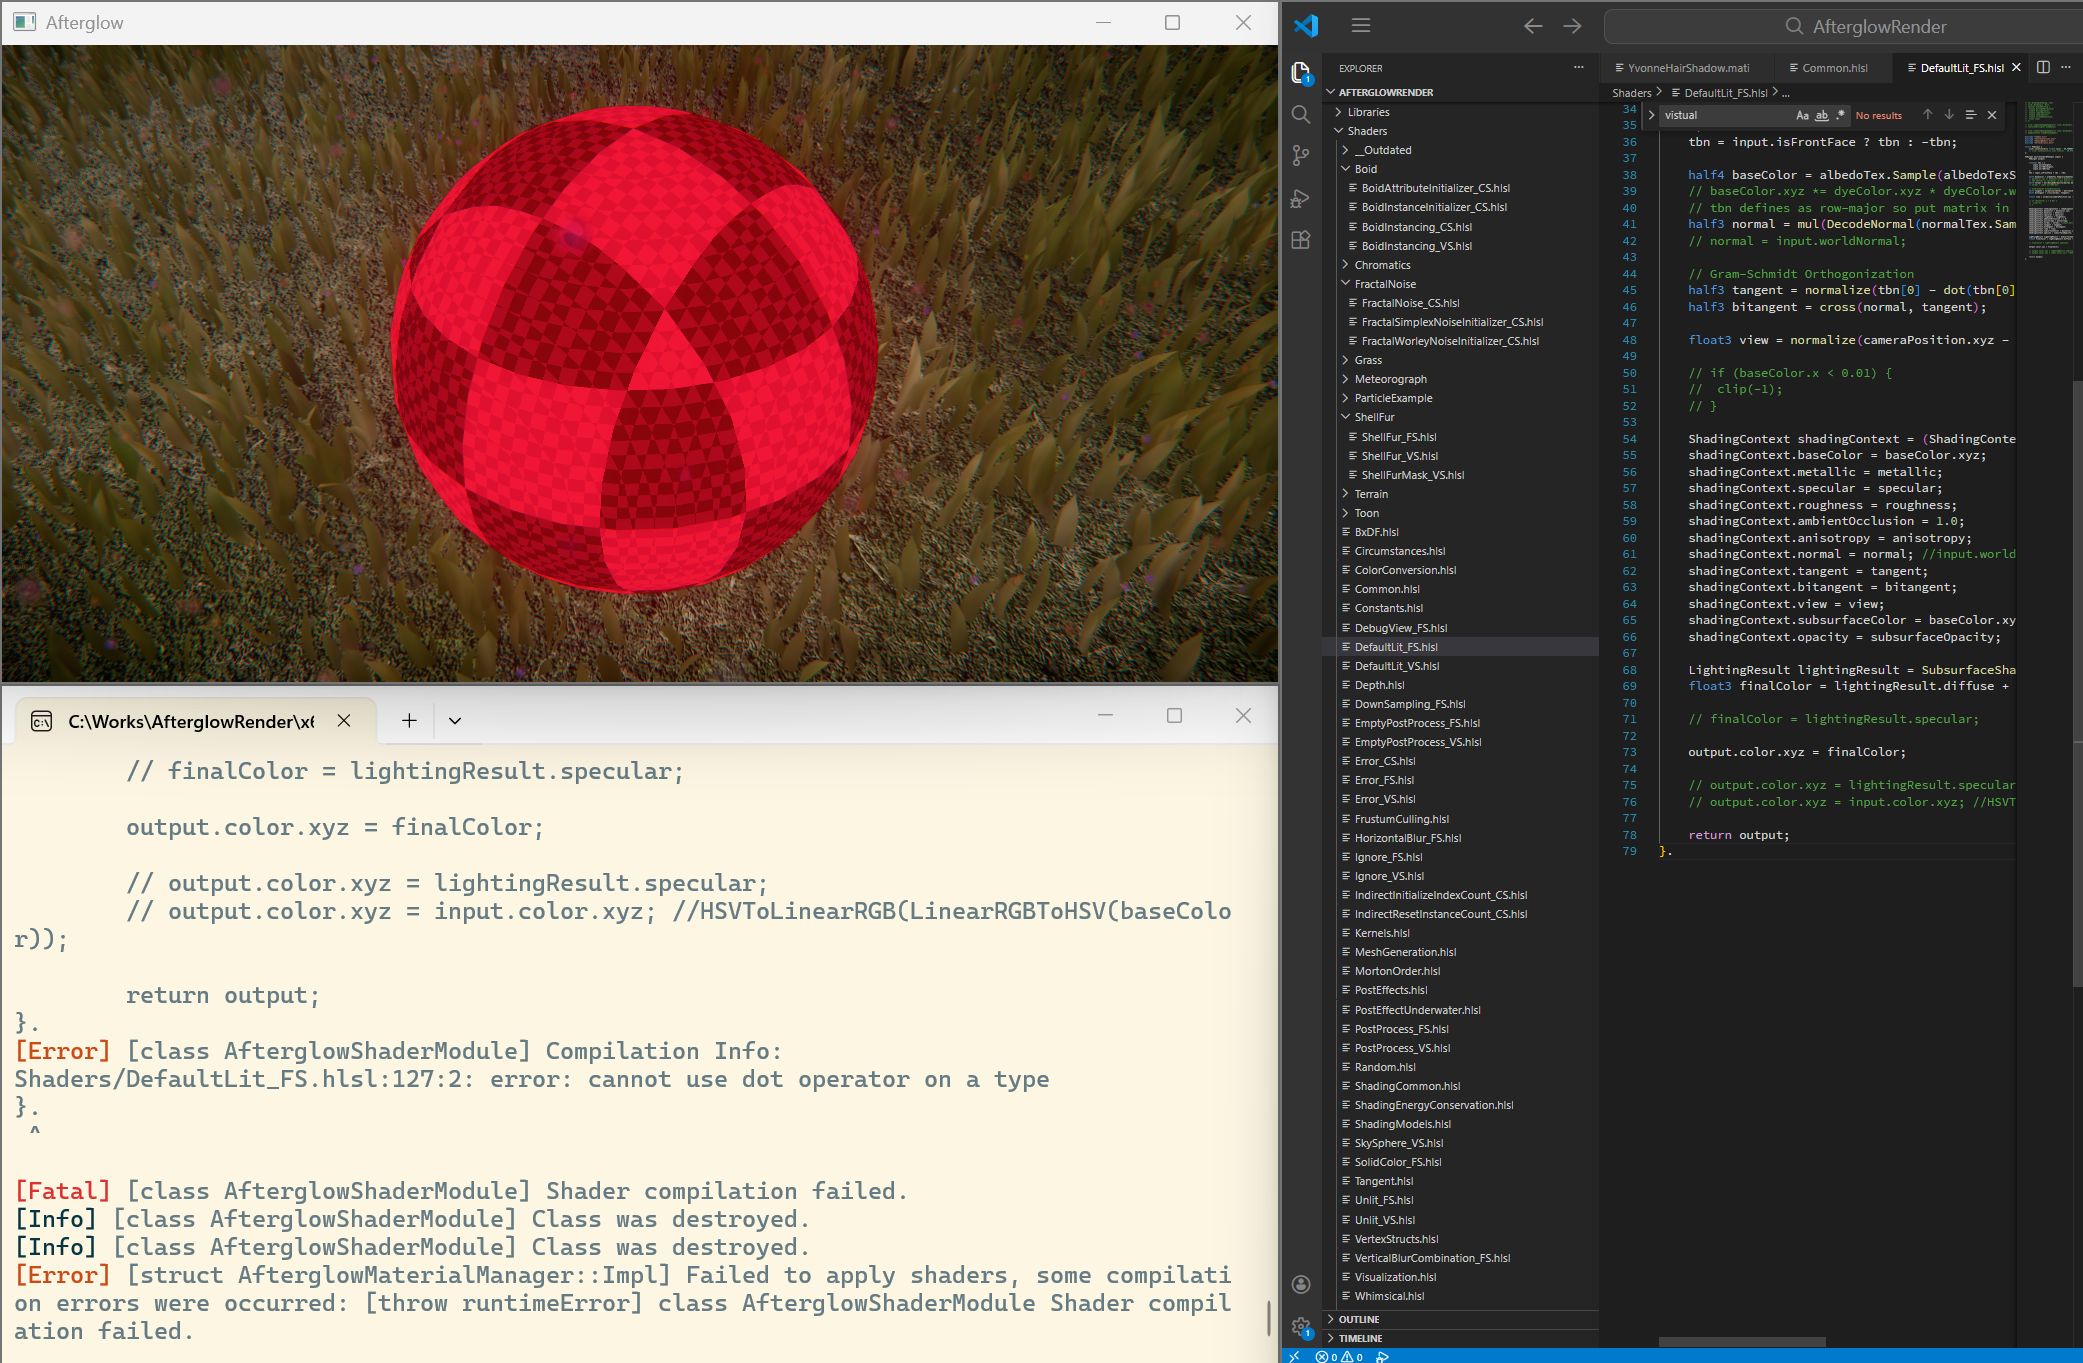
Once you were completed entity and material configurations, relavant materials and shaders can be modified at runtime. Simply use your preferred text editor to edit material or shader asset, and the changes will take effect immediately after you save the file.
If a problematic shader code is submitted, the system will apply a default error material as replacement, and the error infomation will be output to the console.
Compute Workflow
To enable the compute workflow for a material asset, you need to add the following ComputeTask field to the material asset file:
For more details about ComputeTask fields and enumerations, see Documents/AssetStruct/MaterialComputeTask.md
Component Development
This part demonstrates how to create a new componennt for custom purposes.
More examples can be found in ActionComponentLibrary.h
Component Declaration
In AfterglowRender, all custom components are derivied from AfterglowActionComponent.
#include "AfterglowActionComponent.h"

class MyComponent : public AfterglowActionComponent<MyComponent> {
	 // TODO: ...
};
Lifecycle Pattern Functions
AfterglowActionComponent includes a series of lifecycle event functions, similar to MonoBehaviour in Unity.
Override the required functions in your component class to implement different functionalities.
| Function | Description |
|---|---|
awake() |
Called when the component is initialized. |
onEnable() |
Called when the function enable() is invoked. |
update() |
Called every frame. |
fixedUpdate() |
No yet implemented. |
onDisable() |
Called when the function disable() is invoked. |
onRenderBegin() |
Called after the renderer is initialized but before the render thread start(e.g. for custom PassSet registration.) |
All of these functions follow Curiously Recurring Template Pattern (CRTP).
System Utilities
sysUtils() is the primary way for components to access the system context. The code below shows how to override lifecycle functions and use sysUtils().
#include "AfterglowActionComponent.h"

class MyComponent : public AfterglowActionComponent<MyComponent> {
public:
	inline float deltaTime() const noexcept { return _deltaTime; }

	// Override update()
	void update() {
		// Update _deltaTime every frame from sysUtils()
		_deltaTime = sysUtils().deltaTimeSec();
	}

private:
	float _deltaTime = 0.0f;
};
Note: To reduce compilation dependencies, sysUtils() does not include all relavant header files. For some interfaces, you may need to manually include their corresponding header files.
Register Component
Before adding a component to an entity, it is necessary to register the component.
// AfterglowComponentRegistery.h

// Include the component's header file.
#include "MyComponent.h"

// namespace reg
namespace reg {
	using RegisteredComponentTypes = std::tuple<
		// ...OtherComponents
		// Register component here
		MyComponent
	>;

	// ...

}
Reflection Declaration
For GUI generation, you need to write a reflection declaration.
// ...Class Declaration

// Reflection declaration.
INR_CLASS(MyComponent) {
	// Base class reflection.
	INR_BASE_CLASSES<AfterglowActionComponent<MyComponent>>;
	// Function reflection.
	INR_FUNCS (
		INR_FUNC(deltaTime)
	);
};
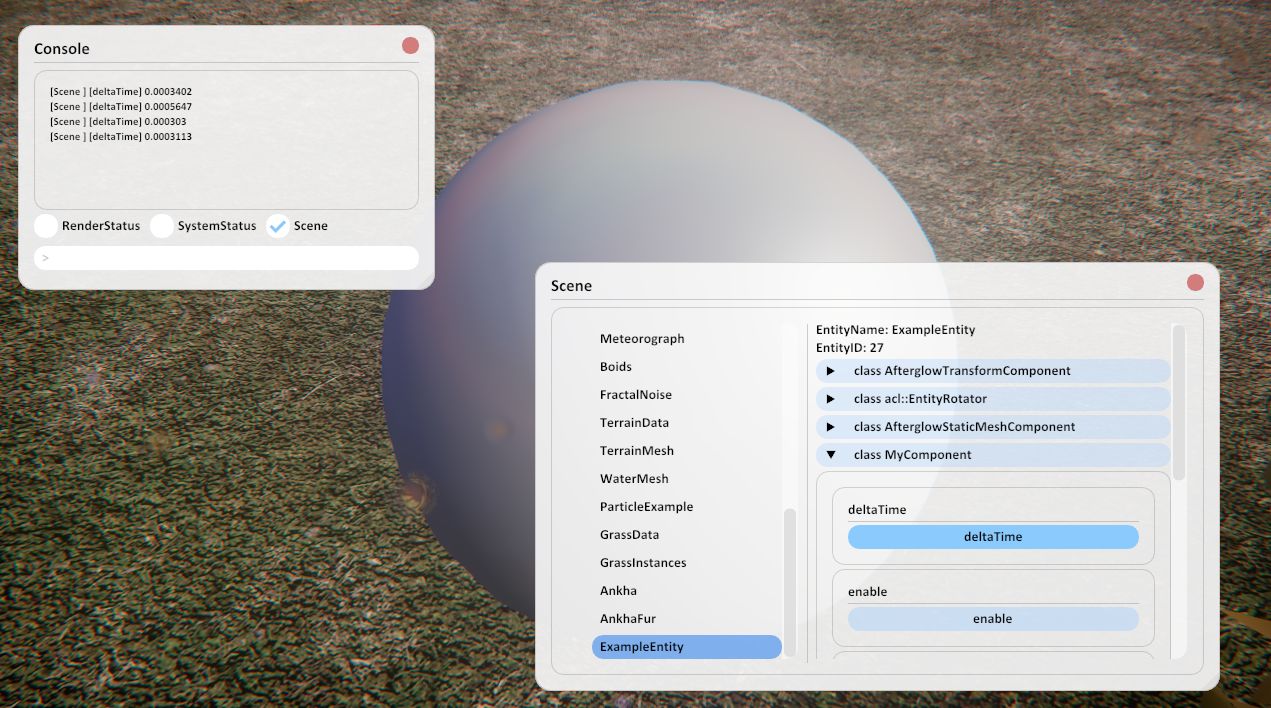
Add Component to Entity
Finally, you only need to add the component to the entity to make the component take effect.
	// Insert these codes at the end of the AfterglowApplication::AfterglowApplication(), AfterglowApplication.cpp.

	// ...ExampleEntity Creation
	// Add MyComponent to ExampleEntity
	_system.addComponent<MyComponent>(exampleEntity);